Páginas

28 de septiembre de 2010

Mushroom and onion chicken

I'm sorry, I've been a bad blogger. Shame on me. Buuuut, be aware this week I have some very interesting recipes prepared. Besides, this week is extra special because I just started the classes so the challenge becomes real.

But let's begin with a super easy, quick and healthy recipe, shall we? Mushroom and onion chicken. I'll tell you when this works, mushroom and onion chicken is perfect when you have (or want) no time to spent cooking but you know that another sandwich would be wrong.


Start preparing the mushrooms. Of course you can get mushrooms already sliced so you can jump into the next step, if you didn't just follow my lead :)

So, cut the bottoms and cut them in four. 


Clean them after.


Next, add chicken breast halves to a pan and sprinkle some salt and peppa'. By the way, I grease the pan with a bit of oil and with a towel paper I spread it, something I learned from Japanese cuisine. How do you do it?

While chicken cooks, grab an onion, peel it and cut it in half. Then slice each half like if you wanted to do onion rings.


Remove the chicken and add an olive oil spurt and the vegetables. Stir in parsley. When the vegetables are pretty much done, add the chicken so it can take the juices and the smell... yum!


After 3 minutes, serve and enjoy! Maybe some mashed potatoes or broccoli can complete the meal...

Note: not ketchup allowed please. Thank you.


MUSHROOMS AND ONION CHICKEN
Serves 2
  • 2 skinless and boneless chicken breast halves
  • 1 mushroom tray
  • 1 medium-large onion
  • parsley
  • olive oil
  • salt&pepper
1. Cut mushroom bottoms. Cut mushrooms in 4. Clean them in running water.
2. Add chicken breast halves to a hot pan and cook til each side browned.
3. While chicken cooks, cut onion in thin slices. 
4. Remove chicken from pan, add a spurt of oil and add vegetables. Stir in parsley and add the chicken when mushrooms are tender.
5. Serve immediately and enjoy!


xo,
Adela*

14 de septiembre de 2010

Butter roasted potatoes


I am sure this recipe changes from one home to another, I share my particular version which is the easiest I found around, basically because it only needs 3 ingredients. Yep, three. Potatoes, butter and salt. That's it. So it's perfect for those who literally don't have anything in the fridge and still want something tasty for a casual dinner. 

Preheat the oven at 200 ºC
 
Begin by cleaning and drying the potatoes you'll use. Do not forget drying them so that the potatoes don't spend useless time in the oven... and so that the butter doesn't mix with the water.

Cut them in half. Then, tear them in "semi slices", just like in the photo. This step will make easy the baking.


Melt some butter. In the microwave in the lowest w. for just a minute will be more than enough.


Paint the potatoes with the melted butter. Bake in the oven for a quarter. Then, paint again and bake for another quarter. They should be done by then.


Now let's dedicate a few word to this wonderful salt over here. It's Camargue Salt and it's delicious!! It's able to save a dish from blandness or, which is the same, disaster. Add a bit of this magic powder in a simple plain dish and you will be surprised by its work. Whatever it is, salmon, steak or potatoes, Camargue salt makes its effect. If you can't find it in your area, no worries, use sea salt instead.

You can paint again the potatoes if you're feeling it, I know you are because I was.

After this pause, sprinkle some salt, some pepper if you want... I didn't, I wasn't feeling in the mood for pepper in this. I just though that it would decrease the creaminess of the potatoes... just a thought.


Serve warm and enjoy!


BUTTER ROASTED POTATOES
Serves 2
  • 2 medium potatoes
  • 2 tsp butter
  • sea salt
1. Preheat oven at 200ºC. 
2. Clean and dry potatoes. Cut them in half. Tear every half simulating slices.
3. Melt butter. Paint generously the potatoes with butter. 
4. Bake for about 15 minutes. Paint again generously and bake for another 15 minutes.
5. Paint another time with more butter and sprinkle with sea salt.


Hope you like it!
xo,
Adela*

13 de septiembre de 2010

Super basic steamed mussels

Remember that monkfish in tomato sauce I (and my dad) made last weekend? A usual pairing  would be a salad. But, who wants usual when you can get extraordinaire?

Our foolish self knows that the best way to pair fish and seafood is with more seafood. However, after cooking the hell out of us with the monkfish, I propose a great five minute’s appetizer: super quick and basic steamed mussels.


Start cleaning and opening the mussels. Kick the sand off. 


I don’t know how to name this pot… it is made of two and the top has little holes, it’s to make steamed food. But if you got that Chinese thing that also cooks steaming, use that, whatever you got will be perfectly fine.

Fill the bottom pot with water and add a lemon slice and a couple of bay leaf. This will add a bit extra flavor on the mussels. Put the mussels in the top pot and cover it. Turn the heat on and cook for about 10 minutes.

Serve with lemon and easy as that, you got an excellent appetizer in less than 15 minutes.

Enjoy!

xo,
Adela*

5 de septiembre de 2010

Zucchini and parma ham risotto

Did someone ask for dreamy? I mean, creamy? This is a pretty quick, as quick as a risotto can be, and totally efficient dish.

By the way, parma ham = salted ham.

Here's what we'll need.

Usually a risotto is made with some wine but I don't use it, I'm rounded with very sensitive palates...  


Start cleaning the rice with water and let it strain. Grab an onion, cut the top and the bottom, then peel off the outer skin and chop the onion nicely. Next, add two teaspoons of butter in a large skillet. When the butter is melted, add the chopped onion. Stir... and do some dancing while you're waiting, if you are in the mood... turiruriuuuu.... add the rice when the onion is kind of transparent. Yeah, you heard me, raw rice.

We'll keep low heat all the time.


The rice will become transparent-ish in a while too. When that happen, add enough stock to cover the rice. I used chicken stock to add a bit of consistency but you can use any kind of stock you like but fish stock, that would taste weird with the ham. 

Add more stock when the rice absorbs most of it. Keep adding so the rice is always covered by it.


Meanwhile the rice and stock mixture is boiling (not forget to stir once in a while and add more stock if needed), peel roughly two zucchinis and cut them in fine slices.


Cut the tops and the bottoms of the spring onions and take the outer skin, same as regular onion. Chop the spring onions in chunky pieces.


Then, in a different skillet, add some olive oil. When it's hot, add the zucchini slices and the spring onion chunks. Cook for about five minutes.
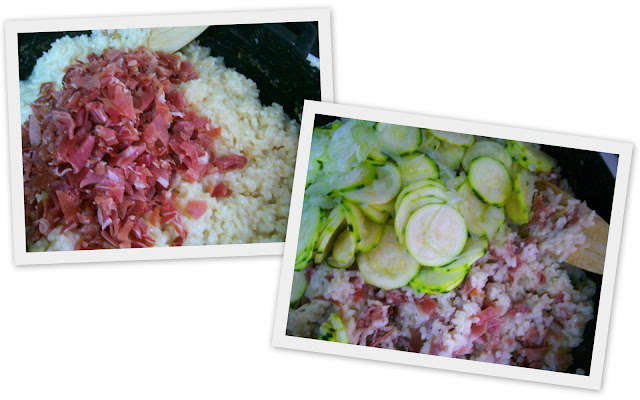
In the meantime, grate some cheese. Parmesan would be great, actually would be awesome. But some other with similar texture works perfectly fine. Also, cut parma ham in small pieces with scissors.


At this point, the rice should look something like THIS, and it should be done already. Know what? Taste it. If you don't, you'll never know. So... done? Good, add the grated cheese and two teaspoons of butter. Stir well together (and taste again, mmmmmh...)


Finally, add the parma ham and the vegetables.


Taste again and... spice it with some pepper and salt.

Oh yeah, and taste again.


I almost forgot! The secret ingredient! Cut some leafs of fresh basil and add them.


And... lunch is served!


THE END...


ZUCCHINI AND PARMA HAM RISOTTO
Serves 4

  • 300g white rice
  • 1 onion
  • 4 tsp butter
  • 1L stock
  • 2 zucchinis
  • 3 spring onions
  • 3 tbsp olive oil
  • 90g grated cheese (Parmesan better)
  • 200g parma ham
  • basil
  • salt & pepper
1. Clean rice under running water. Stir.
2. Peel and chop the onion nicely. Melt 2 of the tsp in a large skillet. Add the onion and fry it lightly. Add the rice and fry it lightly too till it looks transparent. Pour stock gradually so the rice is always covered by it.  Stir occasionally.
3. Clean and peel roughly the zucchinis, then slice them up. Clean and cut the spring onions in chunky pieces. Fry lightly the vegetables in a different pan with olive oil during 5 minutes. 
4. Cut parma ham in small pieces and grate cheese.
5. After 15 minutes approximately of boiling, the stock will be almost absorbed, add grated cheese and the rest of the butter (2 tsp). Stir. Add parma ham and vegetables. Stir well together, again. 
6. Spice it up and turn the heat off.
7. Clean and cut some basil leafs. Add them to the rice. Stir.
8. Eat and enjoy!

Note: you can decorate the dish with some fresh basil leafs and some grated cheese rind.


Love,
Adela*

4 de septiembre de 2010

Monkfish in tomato sauce also known as "Rapet amb suc"

This is one of my dad specialties and it is supreme. He always says that if he had a restaurant, monk fish in tomato sauce would be its hallmark. It might seem complicated and it is indeed. Okay, not complicated-complicated, it is just elaborate and you don't stop putting in and out things of the same skillet. But your kitchen will smell divine and the expectations of a delicious fish and a nice bread slice to wipe the even more delicious sauce sure worth it.


First of all, put seashells in salted water to clean them up, change the water a couple of times. Start peeling shrimps if you are using fresh ones, if they are frozen, like in our case, take them off the fridge to thaw. 


Grab a dish with some flour. Throw the pieces of monk fish into the flour, one by one. Turn it over (hey! that's my dad's hand!). Not much flour is needed, it is just a touch to help the monk fish getting a nice blond color. Repeat the same procedure but into a hot large skillet with oil instead of the flour dish. Just a touch. Once the pieces are done set aside.

Feel free to add more oil if needed.


Let's continue with the touch thing... First the shrimp... till they got a nice color. Set aside.


Second the shells. Cover the skillet some minutes and... they are going to star popping! Don't remove until all the shells are open. If one or two don't, just throw them away. Remove the juice too, the sauce would be too soupy then. Set aside.


Meanwhile, grate some tomatoes (¿?). My dad's hands again and some weird looking tomato juice...


Mince a wild/spring garlic and an onion very nicely, we don't want to find onion chunks... Also chop some nuts with the mortar (or buy them already chopped, I won't tell anybody).


Now is when the things start being serious, serious in a super-yummy way. Add the minced onion into the hot skillet in LOW HEAT. You got to be patient here. Wait and stir occasionally. Oh, you can smell too. But don't sniff if somebody is watching...  

Add the tomato juice when the onion is blond. Little secret: if you see that the juice you got is not enough, add a bit of bottled tomato juice, shhhh ;)

Spice it up with some salt and pepper. Yeah, more pepper please. Then the chopped nuts. Stir and let it boil some minutes.


Add the fish pieces. Cover it up until the lid looks like...

THIS! 10 minutes approximately.


Then add the shrimps. This is the world before seashell invasion...

This is how it looks like post-invasion.


After few seconds turn the heat off and that will be it! We can't forget bread slices...


Lunch is ready! yum yum! 

Wipe, wipe, wipe. Wiping clean.


MONK FISH IN TOMATO SAUCE { rapet amb suc }
Serves 4-5
  • 6 large tomatoes
  • 1 onion
  • 1 spring/wild garlic
  • chopped nuts
  • 200g shrimp
  • +/- 400g shell
  • 4-5 monk fish pieces
  • flour
  • oil
  • salt and pepper
1. Clean the shells in salted water. Peel the shrimps.
2. Coat in flour, one by one, the monk fish pieces. Fry them till they look blond in a hot skillet. Remove from heat and set aside. Always in low heat.
3. Fry in the same skillet the shrimps just a few minutes. Remove from heat and set aside.
4. Throw the shells into the skillet and cover it. Remove when they open and set aside.
5. Grate the tomatoes. 
6. Mince the onion and the spring garlic nicely. Fry them lightly. When they have taken a nice blond color, add the tomato juice.
7. Spice it and add the chopped nuts. Stir and let it come to boil.
8. Add the fish monk pieces, put the lid on.
9. After 10 minutes approximately, add the shrimps and the shells.


Love,
Adela*


3 de septiembre de 2010

Spaghetti with leek and salted ham


Woohoo! First recipe! This is great when you got a bunch of spaghetti and you don’t feel like typical tomato sauce, which is what happened to me today. So... leek and salted ham! 

Start slicing the leek and one wild garlic. Usual garlic can be used instead of wild garlic, I just prefer its taste and it's like having a cute little baby leek... so it's fun.


Cut the salted ham, I use scissors because it's faster. That's the kind of gal I am. Oh, and I take that white fat strip off, it just puts on weight.

Use plenty of ham, it what gives richness to the pasta.

Note: if you can't find salted ham in your local area/supermarket, bacon may work as well.


Then drizzle olive oil into a large skillet and let it get warm, but be careful no to burn it! (olive oil will start steaming if that's the case, we don't want that AT ALL). One trick to know when the oil is hot enough is adding some of the ham into the skillet, if it makes "pssssfff" noises means the oil is ready. Next, add the rest of the ham and fry it. Once it's a little toasty, add the leek and the wild garlic. Mix well together until the vegetables are done, 7 minutes approximately.
Note: if leek and wild garlic are getting brown or toasted, probably it's because the heat is too high. Add some water to solve it, swear it works ;)


Just before the oil disappears, add two tablespoons of bread crumbs. They will absorb the extra oil so the result is more compact on not too oily, duh. Too much bread crumbs though, make the dish too dry and hard to swallow.

By the way, because the ham is already salted we don't need to add salt nor pepper.

Finally, add the spaghetti (boiled meanwhile), combine till they're warmed up and...


 TA-DA!! Bon appétit!


   Say "aaaaah"

SPAGHETTI WITH LEEK AND SALTED HAM
Serves 4

  • 400g pasta
  • 2 leek
  • 1 wild garlic
  • 150g salted ham approximately
  • 2 tbsp bread crumbs
  • olive oil

1. Slice leek and wild garlic. Set aside.
2. Cut salted ham in small pieces.
3. Add the ham into a large skillet with some hot olive oil. Fry it.
4. Add the leek and wild garlic, mix till they are done.
5. Add bread crumbs and mix well together.
6. Add the pasta. Combine.


Easy as pie or what?

Love,
Adela*